Moles Moles Guacamoles
Veja como instalar e configurar um gateway de acesso utilizando o software Guacamole.
Nota
Para utilizá-lo com a VPN deverá gerar antes, os devidos certificados digitais.
Visão Geral
Em resumo, a Instalação e a Configuração da solução será:
Sistema Operacional: CentoOS 7
Servidor Web: Apache (2.4.6)
Servidor de Aplicação: Tomcat (7.0.54)
Banco de Dados: MariaDB (5.5.47)
Compilador: gcc
Softwares: Guacamole (0.9.9) e Extensões (banco de dados e ldap)
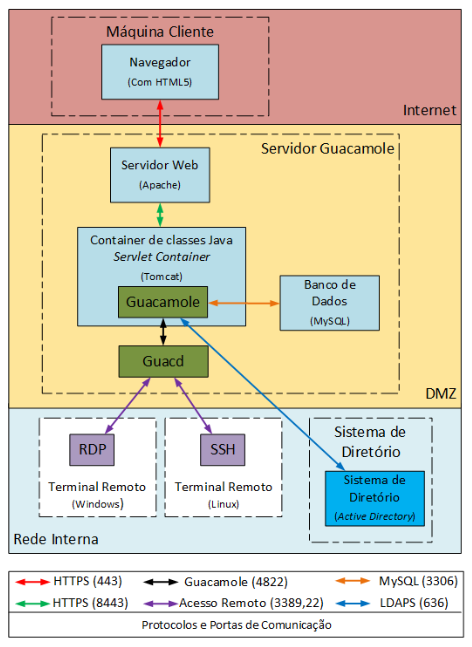
Diagrama da arquitetura da instalação do Guacamole e seus componentes feita nesta documentação.
Instalação
Desabilitar serviços que não são necessários e que não serão utilizados:
systemctl disable firewalld
systemctl stop firewalld

systemctl disable postfix
systemctl stop postix
SELinux - Se não souber utilizar, desabilite ou coloque em modo permissivo assim:
setenforce 0

vi /etc/sysconfig/selinux
SELINUX=permissive
Instalar e pacotes:
yum -y install haveged
systemctl start haveged
systemctl enable haveged

yum -y install tomcat
systemctl start tomcat
systemctl enable tomcat

yum -y install httpd
yum -y install mod_ssl
systemctl start httpd
systemctl enable httpd
A documentação e os downloads do softwares são:
Componentes do Guacamole - dependências de pacotes
Repositórios necessários:
yum -y install epel-release wget
wget -O /etc/yum.repos.d/home:felfert.repo http://download.opensuse.org/repositories/home:/felfert/Fedora_19/home:felfert.repo
Pacotes:
yum -y install cairo-devel freerdp-devel gcc java-1.8.0-openjdk.x86_64 libguac libguac-client-rdp libguac-client-ssh libguac-client-vnc libjpeg-turbo-devel libpng-devel libssh2-devel libtelnet-devel libvncserver-devel libvorbis-devel libwebp-devel openssl-devel pango-devel pulseaudio-libs-devel terminus-fonts tomcat tomcat-webapps uuid-devel
Download Guacamole - v0.9.9 - realizar download do Guacamole a ser compilado:
wget -O guacamole-0.9.9.war http://downloads.sourceforge.net/project/guacamole/current/binary/guacamole-0.9.9.war
wget -O guacamole-server-0.9.9.tar.gz http://sourceforge.net/projects/guacamole/files/current/source/guacamole-server-0.9.9.tar.gz
Download das Extensões - realizar download das extensões para utilização com banco de dados e sistema de diretório:
wget http://sourceforge.net/projects/guacamole/files/current/extensions/guacamole-auth-jdbc-0.9.9.tar.gz
wget http://dev.mysql.com/get/Downloads/Connector/j/mysql-connector-java-5.1.38.tar.gz
wget https://sourceforge.net/projects/guacamole/files/current/extensions/guacamole-auth-ldap-0.9.9.tar.gz
Descompactar Guacamole e extensões - extensões para integração com banco de dados e com o LDAP:
tar -xzf guacamole-server-0.9.9.tar.gz
tar -xzf guacamole-auth-jdbc-0.9.9.tar.gz
tar -xzf mysql-connector-java-5.1.38.tar.gz
tar -xzf guacamole-auth-ldap-0.9.9.tar.gz
Criar Diretório Guacamole - será o local de instalação:
mkdir /etc/guacamole
mkdir /etc/guacamole/lib
mkdir /etc/guacamole/extensions
Compilando e Instalando o Guacamole - ao compilar o guacamole, será criado o binário guacd:
cd guacamole-server-0.9.9
./configure --with-init-dir=/etc/init.d
make
make install
ldconfig
Configurar inicialização automática do guacd:
systemctl enable guacd
systemctl start guacd
Disponibilizando Arquivos - após instalação dos componentes e extensões, disponibiliza-se para as devidas pastas:
cd ..
cp guacamole-0.9.9.war /etc/guacamole
ln -s /etc/guacamole/guacamole-0.9.9.war /var/lib/tomcat/webapps/
mv /usr/lib64/freerdp/guacsnd.so /usr/lib64/freerdp/guacsnd.so.old
mv /usr/lib64/freerdp/guacdr.so /usr/lib64/freerdp/guacdr.so.old
ln -s /usr/local/lib/freerdp/* /usr/lib64/freerdp/.

cp mysql-connector-java-5.1.38/mysql-connector-java-5.1.38-bin.jar /etc/guacamole/lib/
cp guacamole-auth-jdbc-0.9.9/mysql/guacamole-auth-jdbc-mysql-0.9.9.jar /etc/guacamole/extensions/
cp guacamole-auth-ldap-0.9.9/guacamole-auth-ldap-0.9.9.jar /etc/guacamole/extensions/
Link para Tomcat:
mkdir -p /usr/share/tomcat/.guacamole/{extensions,lib}
ln -s /etc/guacamole/extensions/guacamole-auth-jdbc-mysql-0.9.9.jar /usr/share/tomcat/.guacamole/extensions/
ln -s /etc/guacamole/lib/mysql-connector-java-5.1.38-bin.jar /usr/share/tomcat/.guacamole/lib/
ln -s /etc/guacamole/extensions/guacamole-auth-ldap-0.9.9.jar /usr/share/tomcat/.guacamole/extensions/
ln -s /etc/guacamole/guacamole.properties /usr/share/tomcat/.guacamole/
Banco de Dados
A instalação do banco de dados e ajustes iniciais.
Nota
Armazene as senhas em local seguro!
Propriedades do Guacamole - essas são as configurações iniciais para subir o serviço com o banco de dados. Mudanças neste arquivo tornam necessário reiniciar o Tomcat.:
echo "# Configurações do Banco MySQL" >> /etc/guacamole/guacamole.properties
echo "mysql-hostname: localhost" >> /etc/guacamole/guacamole.properties
echo "mysql-port: 3306" >> /etc/guacamole/guacamole.properties
echo "mysql-database: guacamole_db" >> /etc/guacamole/guacamole.properties
echo "mysql-username: guacamole_user" >> /etc/guacamole/guacamole.properties
echo "mysql-password: <SENHA>" >> /etc/guacamole/guacamole.properties

systemctl restart tomcat
Instalar banco
yum -y install mariadb-server
systemctl start mariadb
systemctl enable mariadb
Melhorar segurança do banco
mysql_secure_installationCriar conta e banco de dados - criando banco e importando esquemas:
mysql -u root -p
create database guacamole_db;
create user 'guacamole_user'@'localhost' identified by '<SENHA>';
GRANT SELECT,INSERT,UPDATE,DELETE ON guacamole_db.* TO 'guacamole_user'@'localhost';
FLUSH PRIVILEGES;
quit
Criando schema - script com definições do esquema de dados:
cat guacamole-auth-jdbc-0.9.9/mysql/schema/*.sql | mysql -u root -p guacamole_db
Finalizando a Instalação - atualizar pacotes:
yum update
Considerando que os serviços iniciaram corretamente, o sistema estará disponível em http://<IP_DO_SERVIDOR>:8080/guacamole-0.9.9/
Nota
O usuário/senha padrão é guacadmin. Troque a senha!
Configuração
Após a instalação do serviço, a configuração foi feita com base na documentação do fabricante, fórum e boas práticas.
Certificados
Os certificados aqui gerados e configurados serão utilizados logo a frente, para:
Servidor Web - certificado do site (HTTPS). Crie ou importe um certificado (Veja como em certificados digitais:)
Tomcat - certificado para o túnel entre o servidor web e o Tomcat.
Gerar um certificado auto-assinado com o nome tomcat, com validade de 90 dias. Ficará armazenado no diretório “home” do usuário corrente, dentro da keystore chamada .keystore:
keytool -genkey -alias tomcat -keyalg RSA

#### Exemplo na geração do certificado ####
Enter keystore password: <XXXX_SENHA_XXXX>
Re-enter new password: <XXXX_SENHA_XXXX>
What is your first and last name?
  [Unknown]:  Guacamole
What is the name of your organizational unit?
  [Unknown]:  IMPACTA
What is the name of your organization?
  [Unknown]:  IMPACTA
What is the name of your City or Locality?
  [Unknown]:  Cidade
What is the name of your State or Province?
  [Unknown]:  Estado
What is the two-letter country code for this unit?
  [Unknown]:  BR

Enter key password for <tomcat>
        (RETURN if same as keystore password):
O certificado gerado estará no diretório do usuário, mova o arquivo para uma pasta que o Tomcat tenha acesso:
mv ~/.keystore /usr/share/tomcat/.keystore
LDAP - exporte o certificado do Active Directory e importe o certificado para o utilização do LDAPS:
keytool -imporIMPACTAert -alias activedirectory:ca-ad-IMPACTA -keystore /usr/lib/jvm/java-1.8.0-openjdk-1.8.0.101-3.b13.el7_2.x86_64/jre/lib/security/cacerts -file /root/ca-ad-IMPACTA.cer
Para verificar se o certificado foi importado, liste os certificados do cacerts:
keytool -list -keystore /usr/lib/jvm/java-1.8.0-openjdk-1.8.0.101-3.b13.el7_2.x86_64/jre/lib/security/cacerts
Apache
Nota
WebSocket - Mesmo com a configuração de websocket (ws) no Apache, o Web Socket não funcionou devidamente, porém não impacta na utilização do Guacamole. É possível também utilizar o NGINX, faça sua escolha.
Será o serviço responsável por receber as solicitações do usuários e aplicar criptografia no canal (HTTPS) e encaminhar para o Tomcat. O encaminhamento (proxying) do Apache para o Tomcat é feito utilizando também criptografia. Uma configuração de exemplo do Apache:
ServerTokens - ocultar informações sobre apache
Strict-Transport-Security - habilitar o HSTS para evitar certos tipos de ataque MITM
X-Frame-Options - não permite que site seja embutido (iframe) em outro site evitando ataques do tipo clickjacking.
SetEnvIf - definir o que não irá para log, para que não seja gerado muitos eventos que não são muito úteis. Caso de uma conexão é estabelecida e há tráfego de dados entre servidor guacamole e terminal remoto.:
vi /etc/httpd/conf.d/guacamole.IMPACTA.local.conf

# Server version: Apache/2.4.6 (CentOS
ServerTokens Prod
<VirtualHost *:80>
        ServerName guacamole.IMPACTA.local
        ServerAlias guacamole.IMPACTA.local
        ServerAlias vnp
        RewriteEngine on
        RewriteRule "^/$" "https://guacamole.IMPACTA.local/" [R]
        SetEnvIf Remote_Addr "::1" loopback
        CustomLog /var/log/httpd/guacamole.IMPACTA.local-access.log common env=!loopback
        ErrorLog /var/log/httpd/guacamole.IMPACTA.local-error.log
</VirtualHost>
<VirtualHost *:443>
        ServerName guacamole.IMPACTA.local
        ServerAlias guacamole.IMPACTA.local
        ServerAlias guacamole
        SSLEngine On
        SSLCertificateKeyFile /etc/pki/tls/private/guacamole_IMPACTA_local_ssl.key
        SSLCertificateFile /etc/ssl/certs/guacamole_IMPACTA_local_ssl.crt
        RewriteEngine on
        SSLProxyEngine on
        Header always set Strict-Transport-Security "max-age=15552000; includeSubdomains;"
        Header always append X-Frame-Options SAMEORIGIN
        Header unset Etag
        Header set X-XSS-Protection "1; mode=block"
<Location />
        Require all granted
        ProxyPass https://127.0.0.1:8443/guacamole-0.9.9/ flushpackets=on
        ProxyPassReverse https://127.0.0.1:8443/guacamole-0.9.9/
</Location>
<Location /websocket-tunnel>
        Require all granted
        ProxyPass ws://127.0.0.1:8443/guacamole-0.9.9/websocket-tunnel
        ProxyPassReverse ws://127.0.0.1:8443/guacamole-0.9.9/websocket-tunnel
</Location>
        SetEnvIf Request_URI "^/tunnel" dontlog
        CustomLog /var/log/httpd/guacamole.IMPACTA.local-access_ssl.log common env=!dontlog
        ErrorLog /var/log/httpd/guacamole.IMPACTA.local-error_ssl.log
</VirtualHost>
Alguns outros ajustes e também questões de segurança:
vi /etc/httpd/conf.d/ssl.conf

# Desatibilita protocolos fracos/vulneraveis
SSLProtocol All -SSLv2 -SSLv3

# Desabilitar Cifras fracos/vulneraveis
SSLHonorCipherOrder On
SSLCipherSuite ECDH+AESGCM:DH+AESGCM:ECDH+AES256:DH+AES256:ECDH+AES128:DH+AES:ECDH+3DES:DH+3DES:RSA+AESGCM:RSA+AES:RSA+3DES:!aNULL:!MD5:!DSS
Como o certificado do Tomcat é auto-assinado é necessário desativar a checagem de seu certificado, caso contrário o Apache recusará a conexão. Inserir fora do </VirtualHost>:
SSLProxyCheckPeerCN off
SSLProxyCheckPeerName off
SSLProxyCheckPeerExpire off
NGINX
Com este servidor web o Web Socket funciona normalmente:
yum -y install nginx
systemctl enable nginx
Uma das formas para redirecionar o tráfego para HTTPS é comentar parte do arquivo:
vi /etc/nginx/nginx.conf

#    server {
#        listen       80 default_server;
#        listen       [::]:80 default_server;
. . .
#        error_page 500 502 503 504 /50x.html;
#            location = /50x.html {
#        }
#    }
Fazer as configurações no arquivo:
vi /etc/nginx/conf.d/guacamole.kos.local.conf

# nginx version: nginx/1.10.1
map $http_upgrade $connection_upgrade {
default upgrade;
''      close;
}
server_tokens off;
server {
        listen 80 default_server;
        listen [::]:80 default_server;
        server_name _;
        return 301 https://$host$request_uri;
}
server {
    listen 443;
    ssl on;
    ssl_certificate   /etc/ssl/certs/guacamole.kos.local.crt;
    ssl_certificate_key /etc/pki/tls/private/guacamole.kos.local.key;
    add_header X-Frame-Options "SAMEORIGIN";
    add_header Strict-Transport-Security "max-age=15552000; includeSubDomains" always;
    location / {
        proxy_pass https://localhost:8443/guacamole-0.9.9/;
        proxy_buffering off;
        proxy_http_version 1.1;
        proxy_set_header X-Forwarded-For $proxy_add_x_forwarded_for;
        proxy_set_header Upgrade $http_upgrade;
        proxy_set_header Connection $connection_upgrade;
        proxy_cookie_path /guacamole/ /;
        access_log off;
    }
}
Inicie o serviço:
systemctl start nginx
Tomcat
Para permitir que o tráfego entre o Apache e o Tomcat seja criptografado, as configurações abaixo são feitas.
Server > port - destivar porta de shutdown
Listener > SSLEngine - habilitar SSL
Connector > server - alterar nome utilizado para evitar expor versão do tomcat
vi /etc/tomcat/server.xml
<?xml version='1.0' encoding='utf-8'?>
    <!--
    Licensed to the Apache Software Foundation (ASF) under one or more
    contributor license agreements.  See the NOTICE file distributed with
    this work for additional information regarding copyright ownership.
    The ASF licenses this file to You under the Apache License, Version 2.0
    (the "License"); you may not use this file except in compliance with
    the License.  You may obtain a copy of the License at

        http://www.apache.org/licenses/LICENSE-2.0

    Unless required by applicable law or agreed to in writing, software
    distributed under the License is distributed on an "AS IS" BASIS,
    WITHOUT WARRANTIES OR CONDITIONS OF ANY KIND, either express or implied.
    See the License for the specific language governing permissions and
    limitations under the License.
    -->
<!-- Note:  A "Server" is not itself a "Container", so you may not
     define subcomponents such as "Valves" at this level.
     Documentation at /docs/config/server.html
 -->
  <Server port="-1" shutdown="SHUTDOWN">
  <!-- Security listener. Documentation at /docs/config/listeners.html
  <Listener className="org.apache.catalina.security.SecurityListener" />
  -->
  <!--APR library loader. Documentation at /docs/apr.html -->
  <!-- Habilita Modulo SSL -->
  <Listener className="org.apache.catalina.core.AprLifecycleListener" SSLEngine="on" />
  <!--Initialize Jasper prior to webapps are loaded. Documentation at /docs/jasper-howto.html -->
  <Listener className="org.apache.catalina.core.JasperListener" />
  <!-- Prevent memory leaks due to use of particular java/javax APIs-->
  <Listener className="org.apache.catalina.core.JreMemoryLeakPreventionListener" />
  <Listener className="org.apache.catalina.mbeans.GlobalResourcesLifecycleListener" />
  <Listener className="org.apache.catalina.core.ThreadLocalLeakPreventionListener" />

  <!-- Global JNDI resources
       Documentation at /docs/jndi-resources-howto.html
  -->
  <GlobalNamingResources>
    <!-- Editable user database that can also be used by
         UserDatabaseRealm to authenticate users
    -->
    <Resource name="UserDatabase" auth="Container"
             type="org.apache.catalina.UserDatabase"
             description="User database that can be updated and saved"
             factory="org.apache.catalina.users.MemoryUserDatabaseFactory"
             pathname="conf/tomcat-users.xml" />
  </GlobalNamingResources>

  <!-- A "Service" is a collection of one or more "Connectors" that share
       a single "Container" Note:  A "Service" is not itself a "Container",
       so you may not define subcomponents such as "Valves" at this level.
       Documentation at /docs/config/service.html
   -->
  <Service name="Catalina">

    <!--The connectors can use a shared executor, you can define one or more named thread pools-->
    <!--
    <Executor name="tomcatThreadPool" namePrefix="catalina-exec-"
        maxThreads="150" minSpareThreads="4"/>
    -->


    <!-- A "Connector" represents an endpoint by which requests are received
         and responses are returned. Documentation at :
         Java HTTP Connector: /docs/config/http.html (blocking & non-blocking)
         Java AJP  Connector: /docs/config/ajp.html
         APR (HTTP/AJP) Connector: /docs/apr.html
         Define a non-SSL HTTP/1.1 Connector on port 8080
    -->
    <!--
    <Connector port="8080" protocol="HTTP/1.1"
               connectionTimeout="20000"
               redirectPort="8443" />
    -->
    <!-- A "Connector" using the shared thread pool-->
    <!--
    <Connector executor="tomcatThreadPool"
               port="8080" protocol="HTTP/1.1"
               connectionTimeout="20000"
               redirectPort="8443" />
    -->
    <!-- Define a SSL HTTP/1.1 Connector on port 8443
         This connector uses the BIO implementation that requires the JSSE
         style configuration. When using the APR/native implementation, the
         OpenSSL style configuration is required as described in the APR/native
         documentation -->
    <!--
    <Connector port="8443" protocol="org.apache.coyote.http11.Http11Protocol"
               maxThreads="150" SSLEnabled="true" scheme="https" secure="true"
               clientAuth="false" sslProtocol="TLS" />
    -->


    <Connector
              protocol="HTTP/1.1"  server="Guacamole Server" URIEncoding="UTF-8"
              port="8443" maxThreads="150" address="127.0.0.1"
              scheme="https" secure="true" SSLEnabled="true"
              keystoreFile="/usr/share/tomcat/.keystore" keystorePass="XXX_SENHA_XXX"
              clientAuth="false" sslProtocol="TLS" />


    <!-- Define an AJP 1.3 Connector on port 8009 -->
<!--    <Connector port="8009" protocol="AJP/1.3" redirectPort="8443" /> -->


    <!-- An Engine represents the entry point (within Catalina) that processes
         every request.  The Engine implementation for Tomcat stand alone
         analyzes the HTTP headers included with the request, and passes them
         on to the appropriate Host (virtual host).
         Documentation at /docs/config/engine.html -->

    <!-- You should set jvmRoute to support load-balancing via AJP ie :
    <Engine name="Catalina" defaultHost="localhost" jvmRoute="jvm1">
    -->
    <Engine name="Catalina" defaultHost="localhost">

      <!--For clustering, please take a look at documentation at:
          /docs/cluster-howto.html  (simple how to)
          /docs/config/cluster.html (reference documentation) -->
      <!--
      <Cluster className="org.apache.catalina.ha.IMPACTAp.SimpletcpCluster"/>
      -->

      <!-- Use the LockOutRealm to prevent attempts to guess user passwords
           via a brute-force attack -->
      <Realm className="org.apache.catalina.realm.LockOutRealm">
        <!-- This Realm uses the UserDatabase configured in the global JNDI
             resources under the key "UserDatabase".  Any edits
             that are performed against this UserDatabase are immediately
             available for use by the Realm.  -->
        <Realm className="org.apache.catalina.realm.UserDatabaseRealm"
              resourceName="UserDatabase"/>
      </Realm>

      <Host name="localhost"  appBase="webapps"
           unpackWARs="true" autoDeploy="true">

        <!-- SingleSignOn valve, share authentication between web applications
             Documentation at: /docs/config/valve.html -->
        <!--
        <Valve className="org.apache.catalina.authenticator.SingleSignOn" />
        -->

        <!-- Access log processes all example.
             Documentation at: /docs/config/valve.html
             Note: The pattern used is equivalent to using pattern="common" -->
        <!-- Logs estao sendo gravados pelo Apache -->
        <!--
        <Valve className="org.apache.catalina.valves.AccessLogValve" directory="logs"
               prefix="localhost_access_log." suffix=".txt"
               pattern="%h %l %u %t "%r" %s %b" />
        -->
      </Host>
    </Engine>
  </Service>
</Server>
Restringir Acesso - para não permitir acesso direto ao Tomcat é necessário inserir o parâmetro abaixo (dentro do
<Context>):vi /usr/share/tomcat/conf/context.xml
   <!-- Restringe Acesso ao Tomcat-->
     <Valve className="org.apache.catalina.valves.RemoteAddrValve" allow="127\.0\.0\.1" />
Por fim, caso não seja necessário, remova aplicações exemplo que vem com o Tomcat (examples, host-manager, manager, ROOT, sample):
rm -rf /usr/share/tomcat/webapps/{examples,host-manager,ROOT,manager,sample}
Página de Erro - para tratar páginas de erros, edite o arquivo abaixo e inclua as linhas em destaque.:
vi /usr/share/tomcat/conf/web.xml
    <!-- here, so be sure to include any of the default values that you wish  -->
    <!-- to use within your application.                                       -->
   . . .
      <welcome-file-list>
          <welcome-file>index.html</welcome-file>
          <welcome-file>index.htm</welcome-file>
          <welcome-file>index.jsp</welcome-file>
      </welcome-file-list>
          <error-page>
                  <error-code>404</error-code>
                  <location>/error.html</location>
          </error-page>
  </web-app>
Agora, crie a página de erro com o conteúdo de exemplo.:
vi ../webapps/guacamole-0.9.9/error.html
<head>
<title>404</title>
</head>
<body>
<h1>404 - URL inexistente</h1>
Verifique o nome digitado.
</body>
</source>
Altere permissão:
chown tomcat:tomcat ../webapps/guacamole-0.9.9/error.html
Ajustes Finos
Imagens - substitua as imagens padrão para as novas (envie as suas imagens):
cd ../webapps/guacamole-0.9.9/images/
mv logo-64.pnp logo-64.pnp.backup
mv logo-144.pnp logo-144.pnp.backup
mv guac-tricolor.pnp guac-tricolor.pnp.backup
Idioma - adicionar lingua portuguesa do Brasil (envie a sua tradução).:
cd ../webapps/guacamole-0.9.9/translations
cp /tmp/pt_BR.json .
chown tomcat:tomcat pt_BR.json
LDAP - Active Directory
Para permitir a integração ao sistema de diretório (Active Directory) sem a necessidade de alterar seu esquema, o que é considerado um pouco intrusivo, utiliza-se a extensão LDAP da seguinte forma:
vi ../guacamole.properties

# LDAP - Integracao com Active Directory
ldap-hostname: guacamole.IMPACTA.local
ldap-port: 636
ldap-encryption-method: ssl
ldap-user-base-dn: OU=usuarios,DC=IMPACTA,DC=local
ldap-search-bind-dn: CN=guacamole_servico,OU=contas_servicos,DC=IMPACTA,DC=local
ldap-search-bind-password: XXXX_SENHA_XXXX
ldap-username-attribute: sAMAccountName
Reinicie o serviço para validar aplicar as configuraçôes e veja logs para mais informações e debug:
systemctl restart tomcat
Para garantir que tudo esteja bem quando reiniciar o servidor:
reboot
Pronto! A aplicação já pode ser utilizada :)